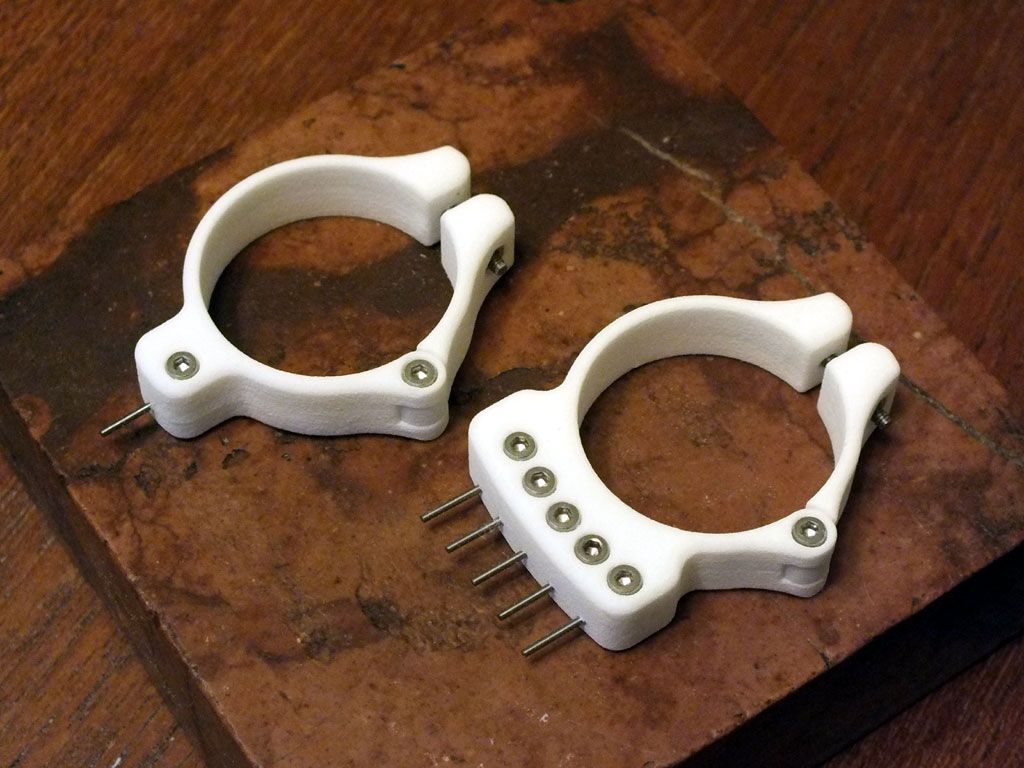
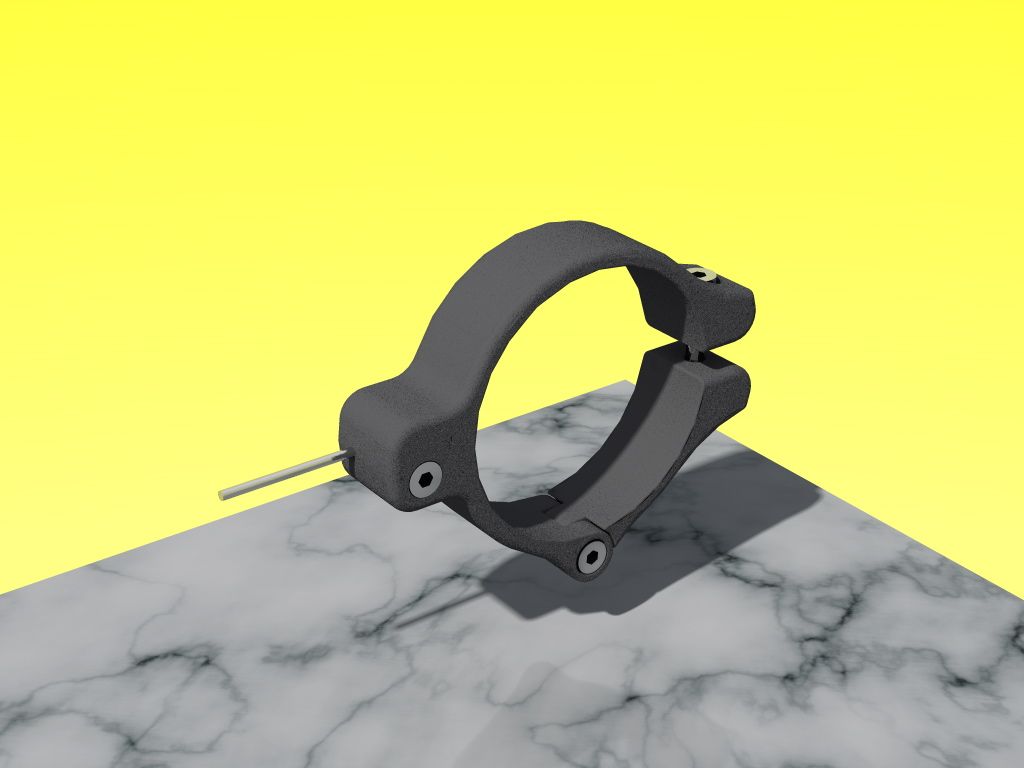
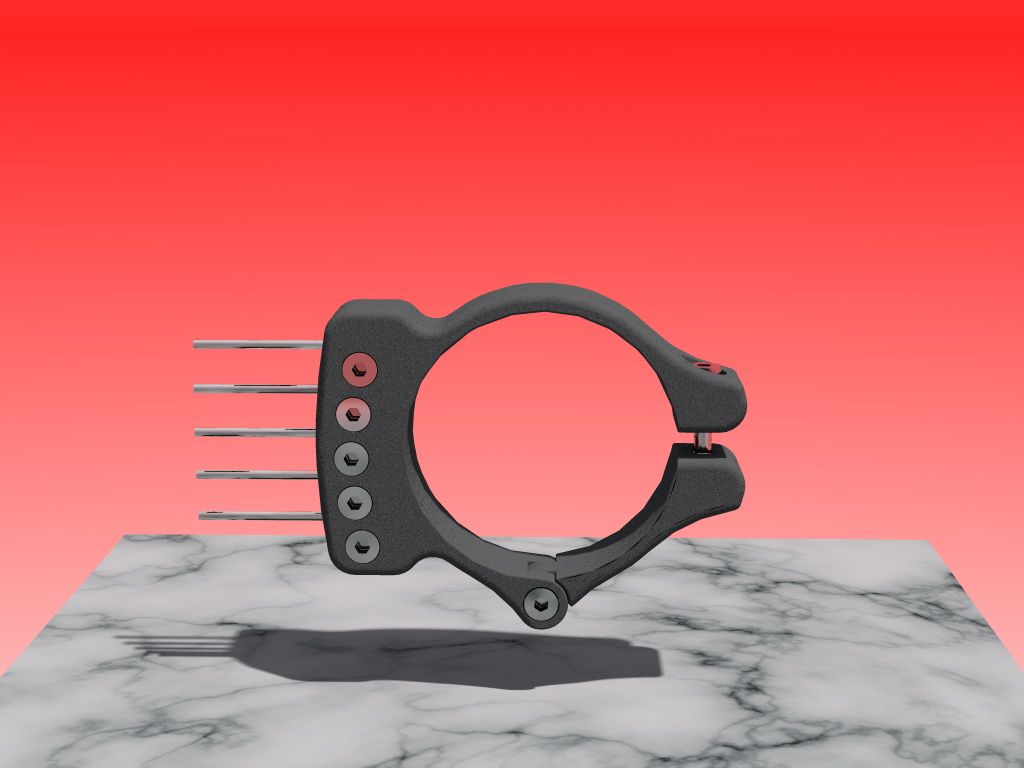
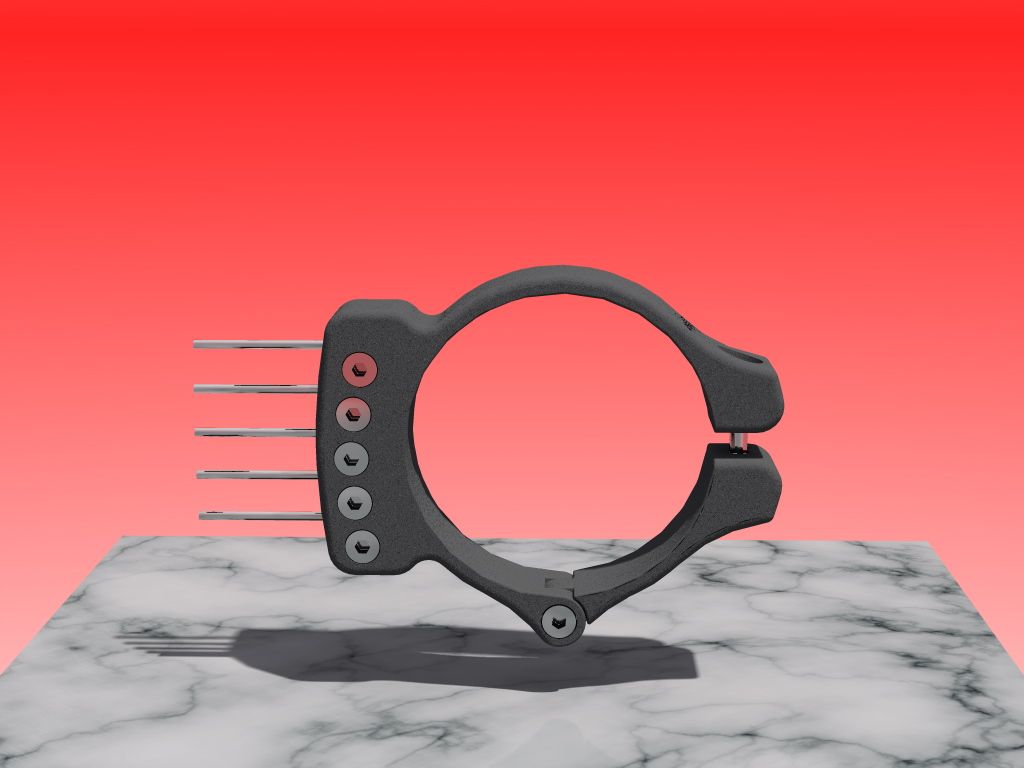
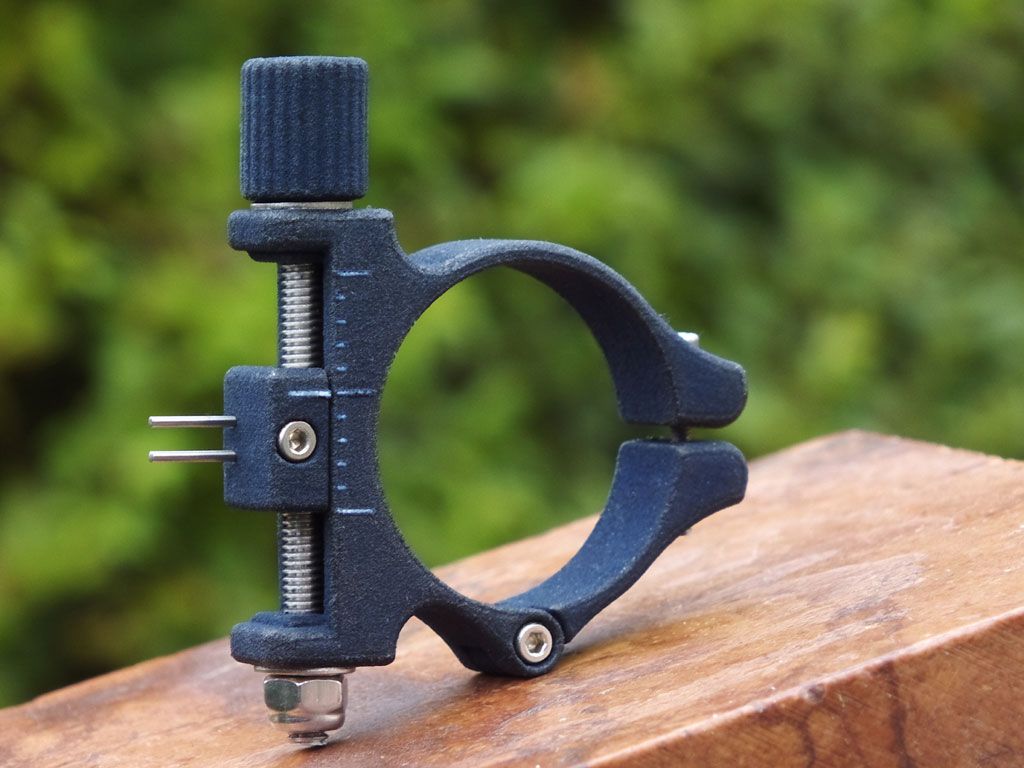
The new EasyPin and MultiPin scope pointers have arrived! Both of these are fixed pointers, with one pin and 5 pins. As usual, I designed them in 3 sizes for the common scope tube sizes: 1″, 30 mm, 34 mm. Now I’m going to dye them and the first orders will be sent out.
EasyPin + MultiPin scope pointers
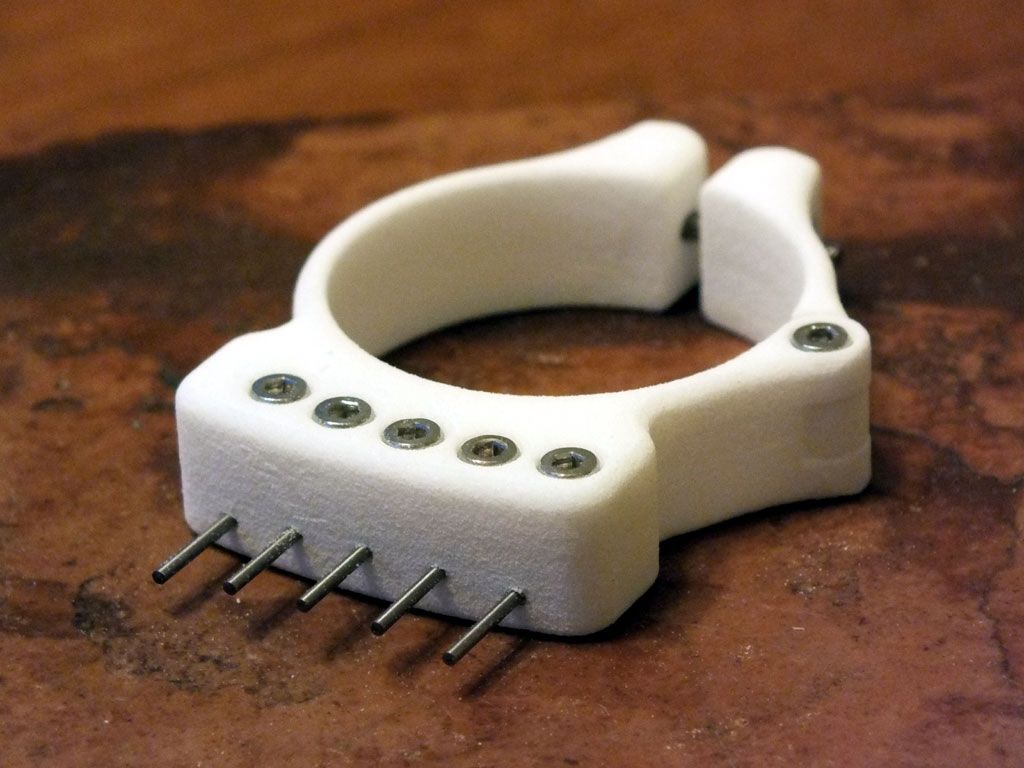
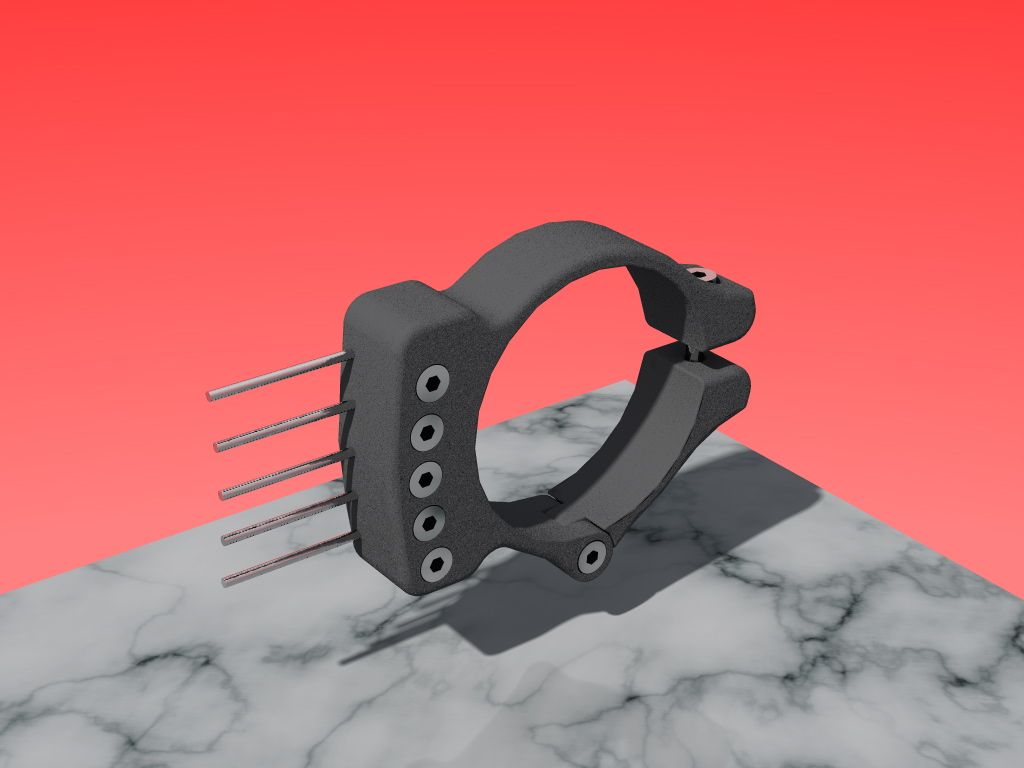
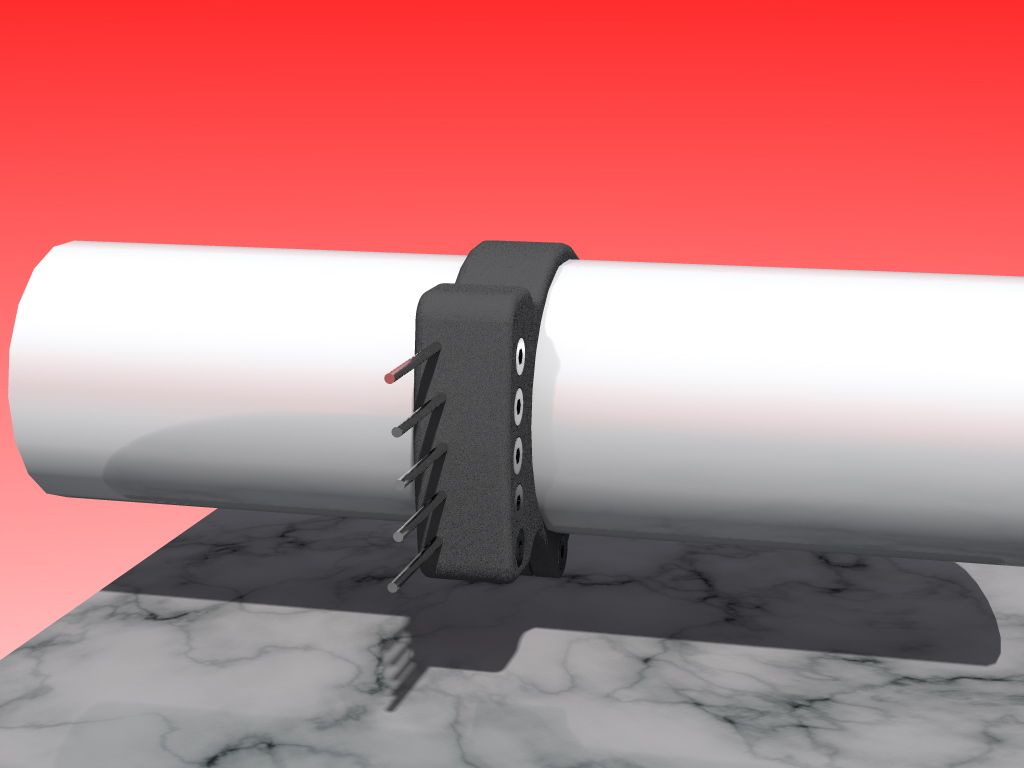
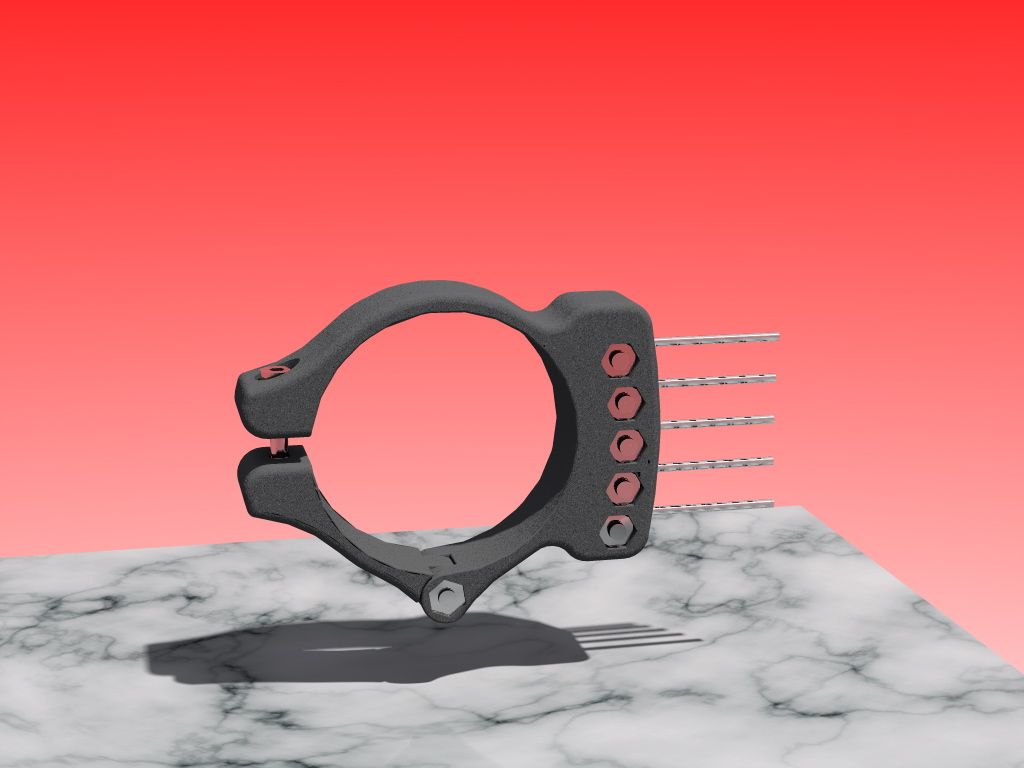
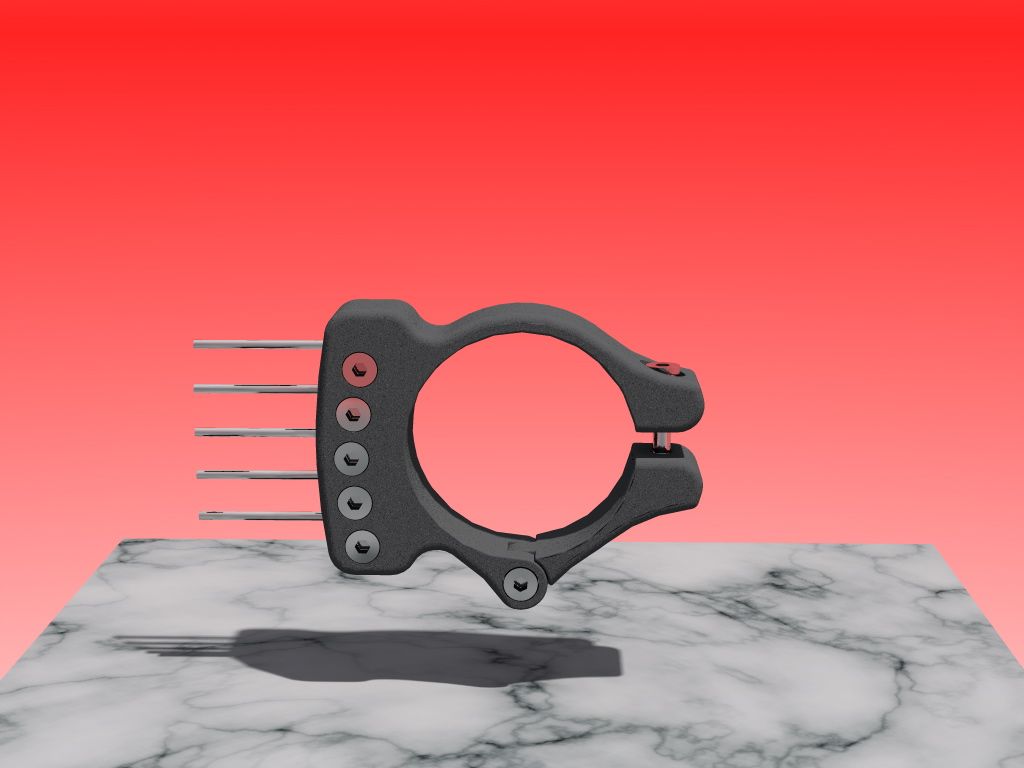
The five pointers follow a slight arc so they fit to the radius of an average scope wheel.
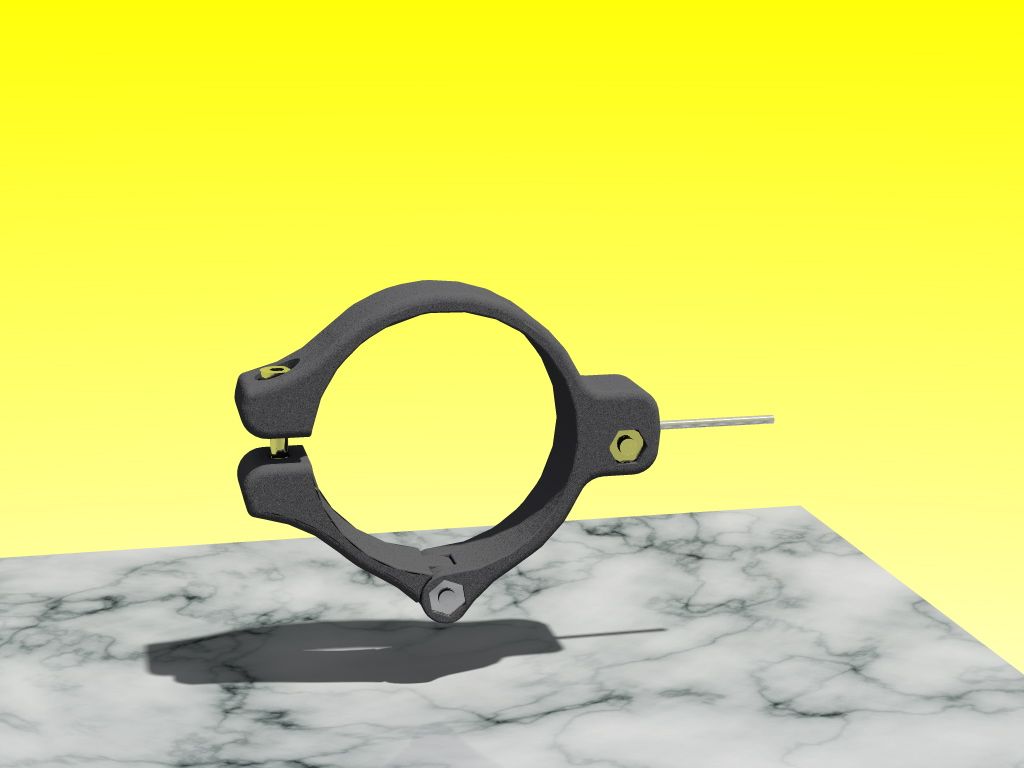
MultiPin in raw white original
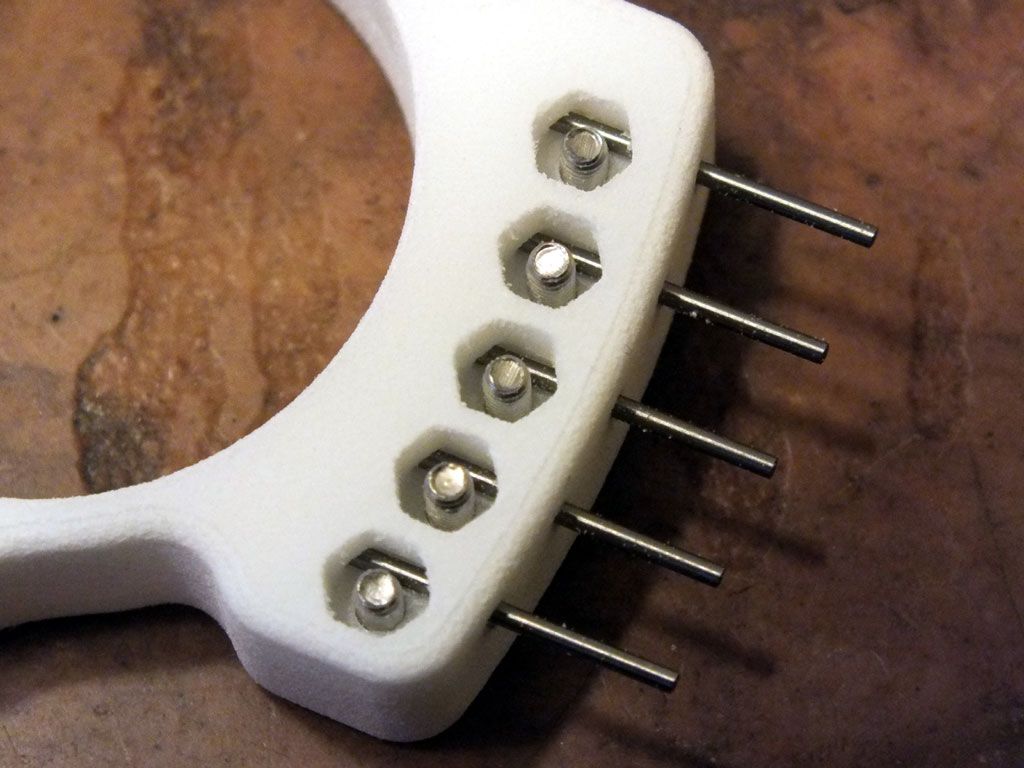
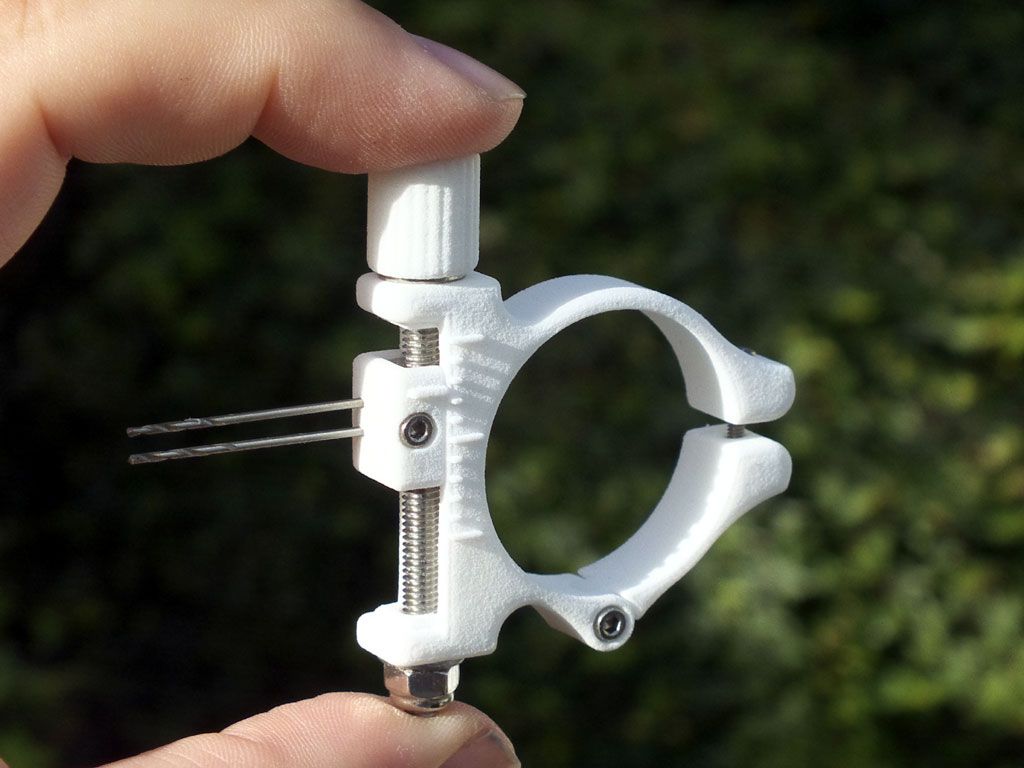
This is how the stainless steel pointer pins are fixed. If it’s needed, you can replace the pins with any similar pin or wire up to 1 mm diameter. Notice the different depth of the hexagonal holes.
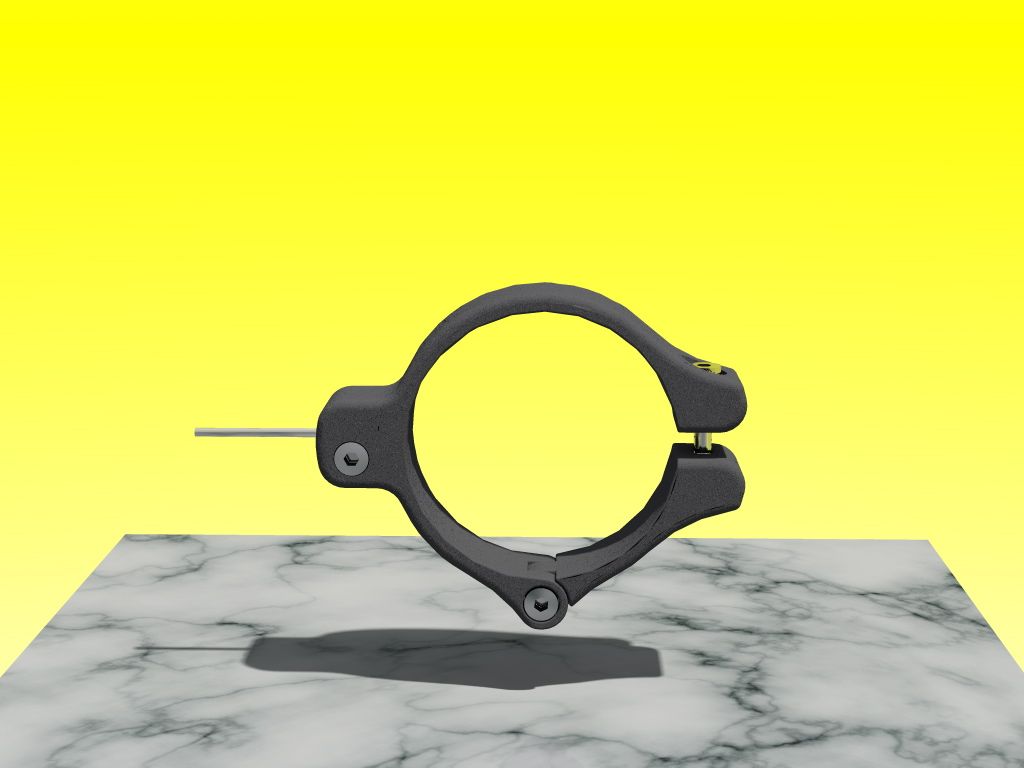
This pointer can help you to deal with scope temperature shifts, or eye fatigue, different environmental light conditions etc. Any of the pins can be removed so you can create your own pointer for your own needs.
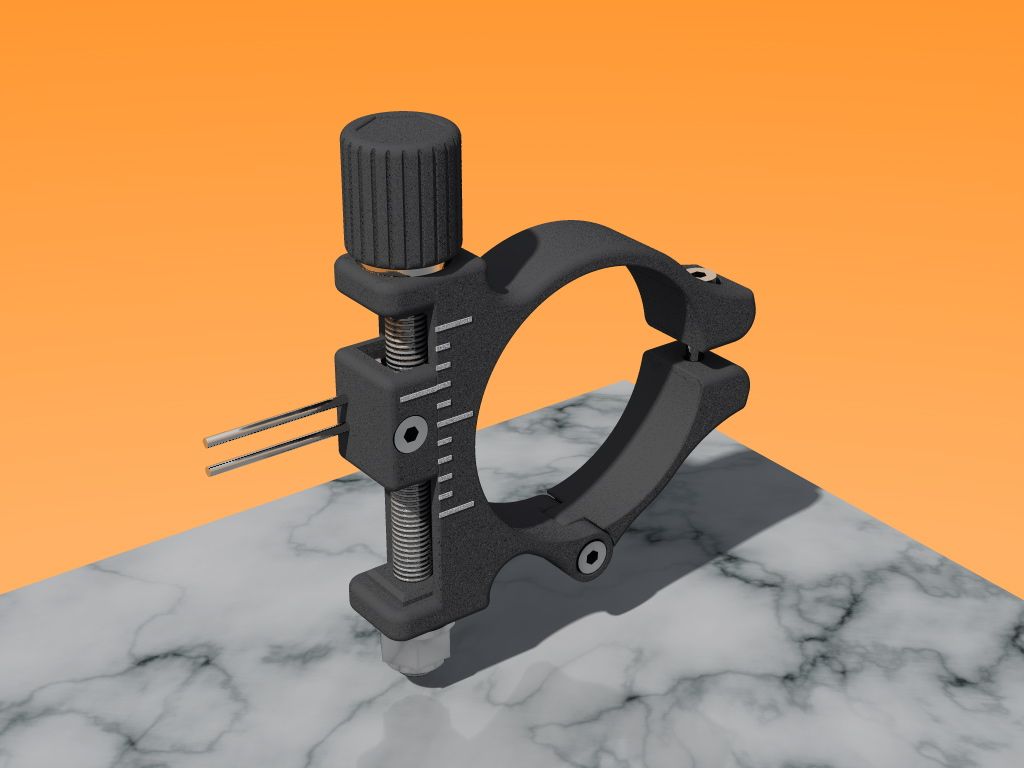
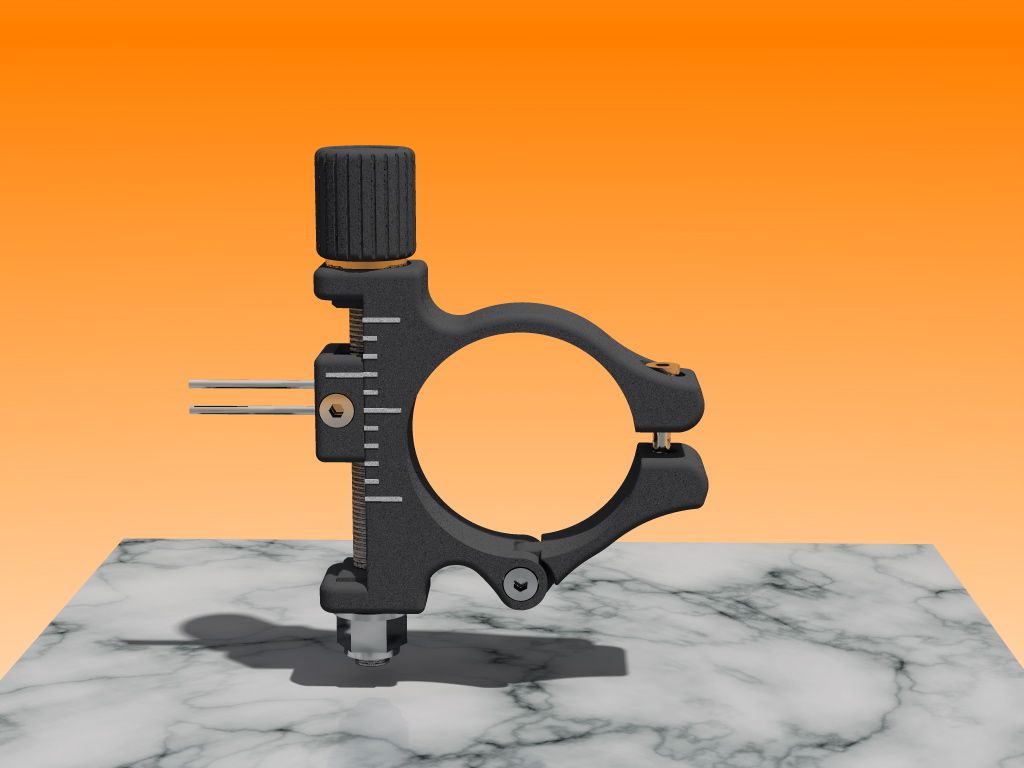
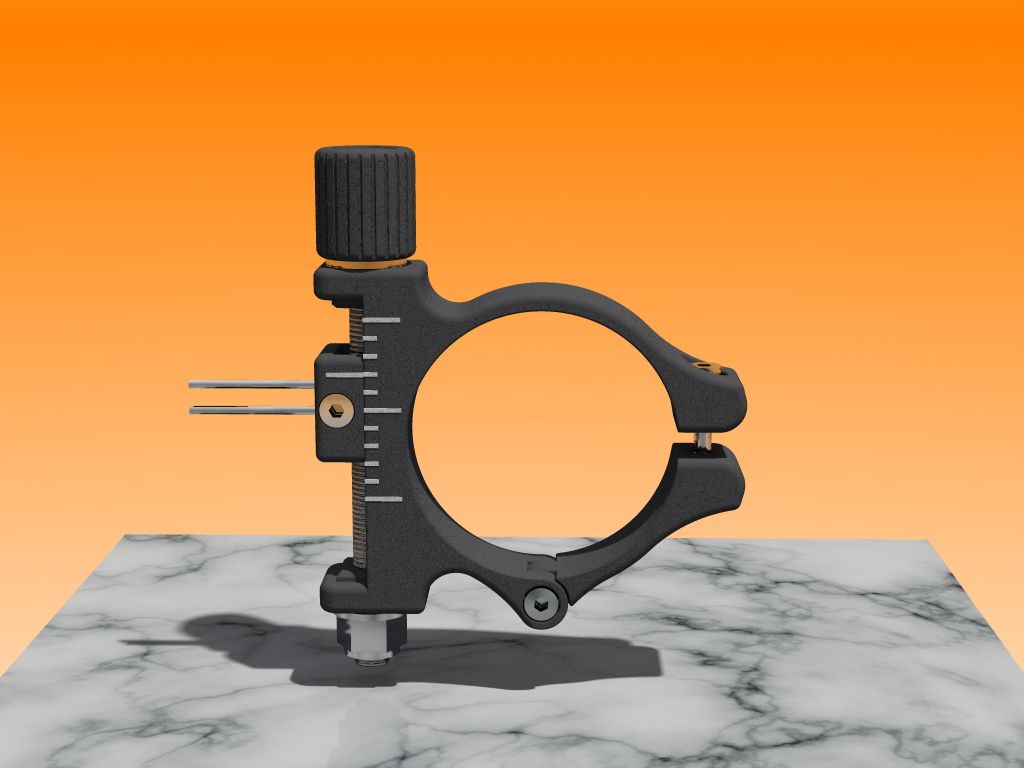
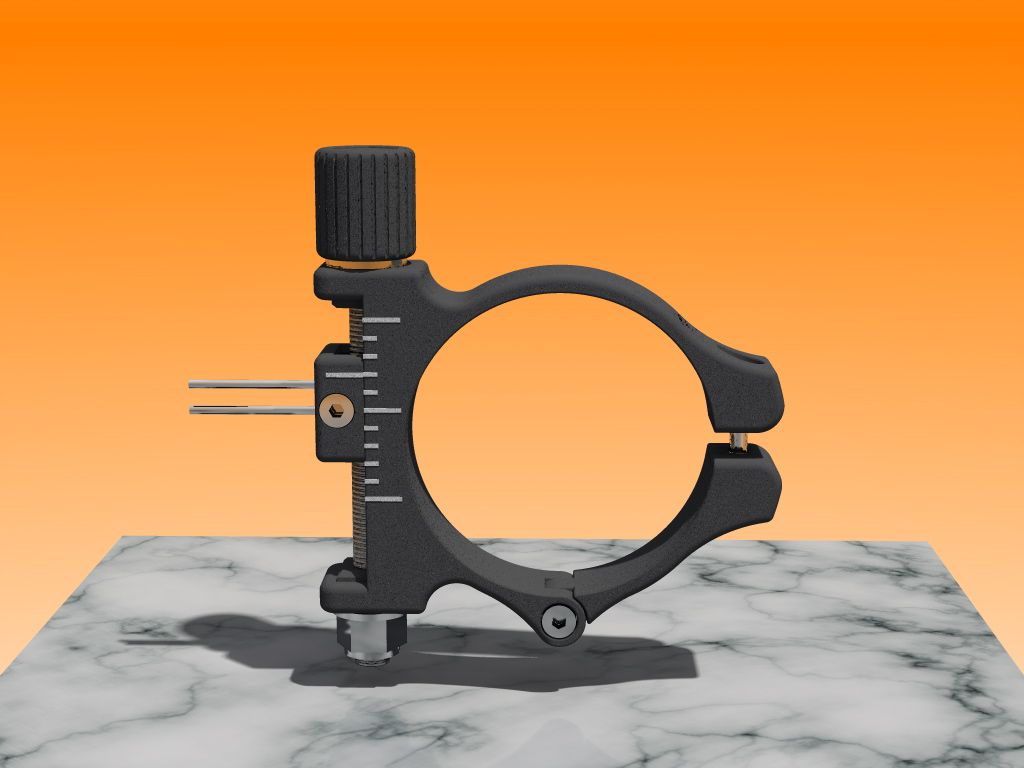
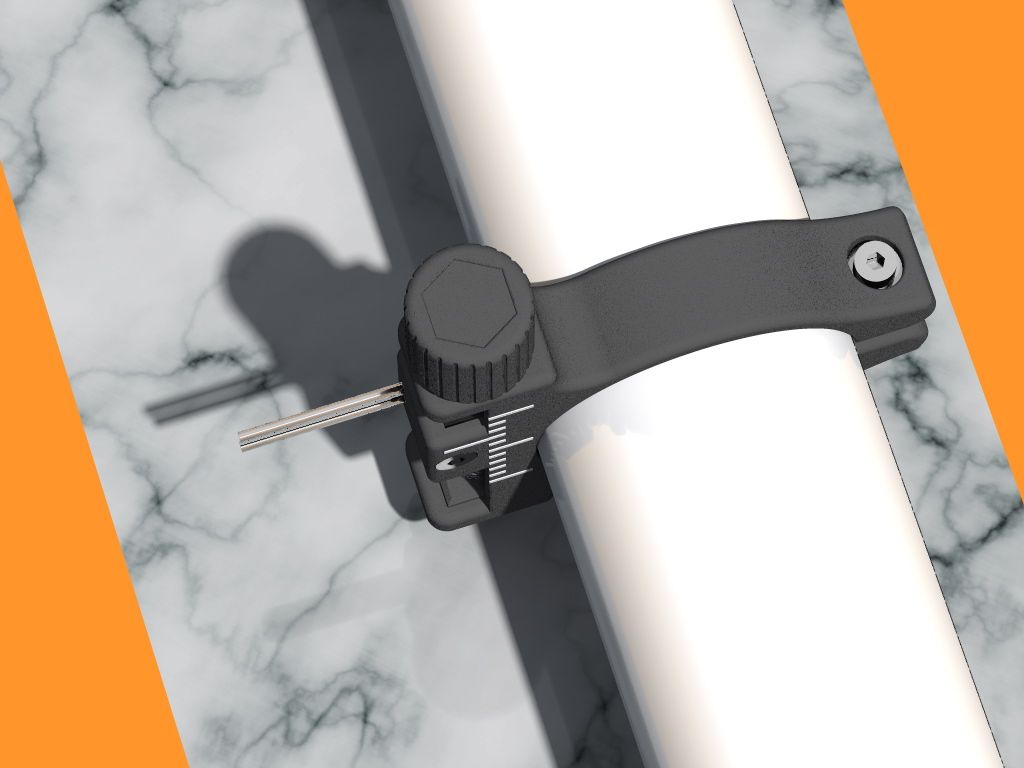
This is the ultimate pointer, with a fine adjustment mechanism for temperature shifts, and double pins for additional corrections (light, fatigue etc.)
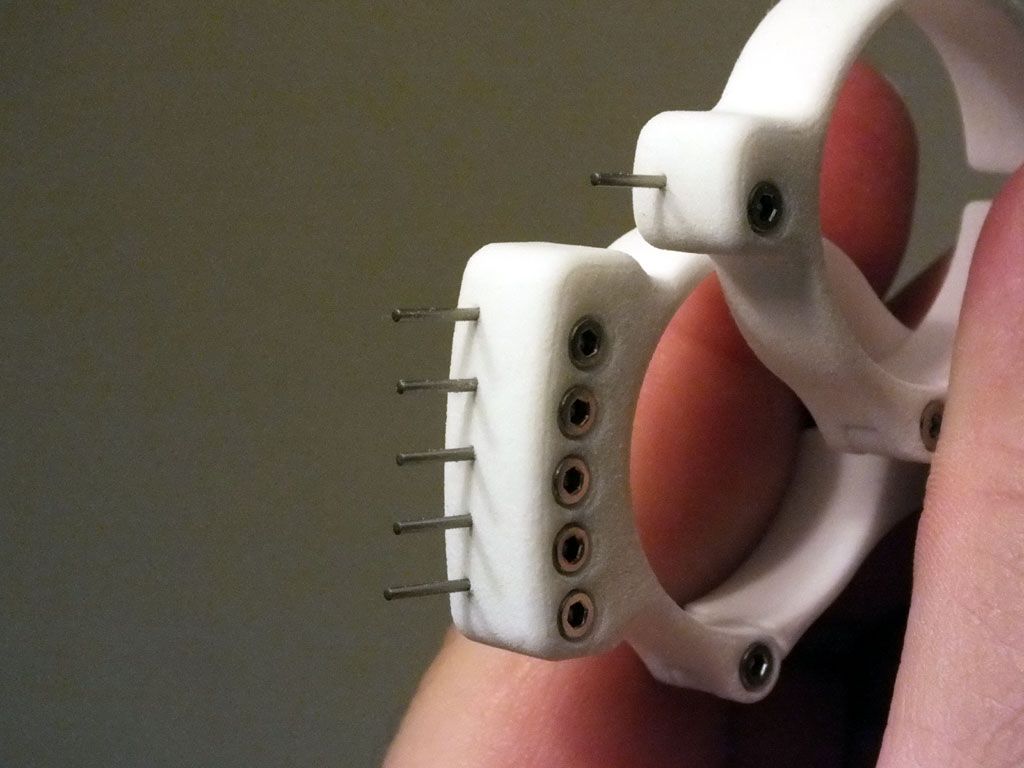
All of these pointers are made of high quality Nylon, nearly as strong as aluminium. The pointer pins, nuts and bolts all are stainless steel. You can remove or replace the pins with any <1 mm wire if needed. In three sizes, for 1″ (25.4 mm), 30 mm and 34 mm scope tubes.
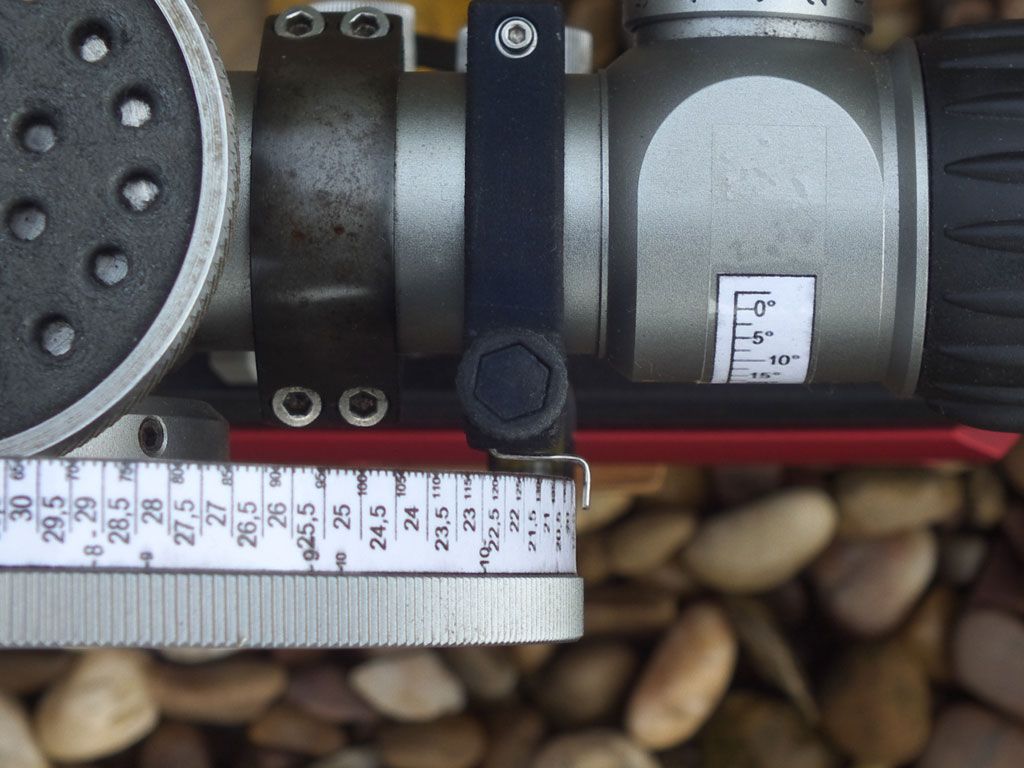
This is a photo of my scope (Schmidt&Bender 12.5-50×56 FT) with my new SmartPin adjustable pointer. As we all know, S&B scopes shift a lot in rangefinding as the outside temperature changes. (Click here to read more about parallax shift.) On my scope, every 10 degrees in temperature mean 4.5 yards shift on a longer (45-55 yds) target. This means a bit more than 8 mm shift on the standard 5″ (125 mm) S&B sidewheel.
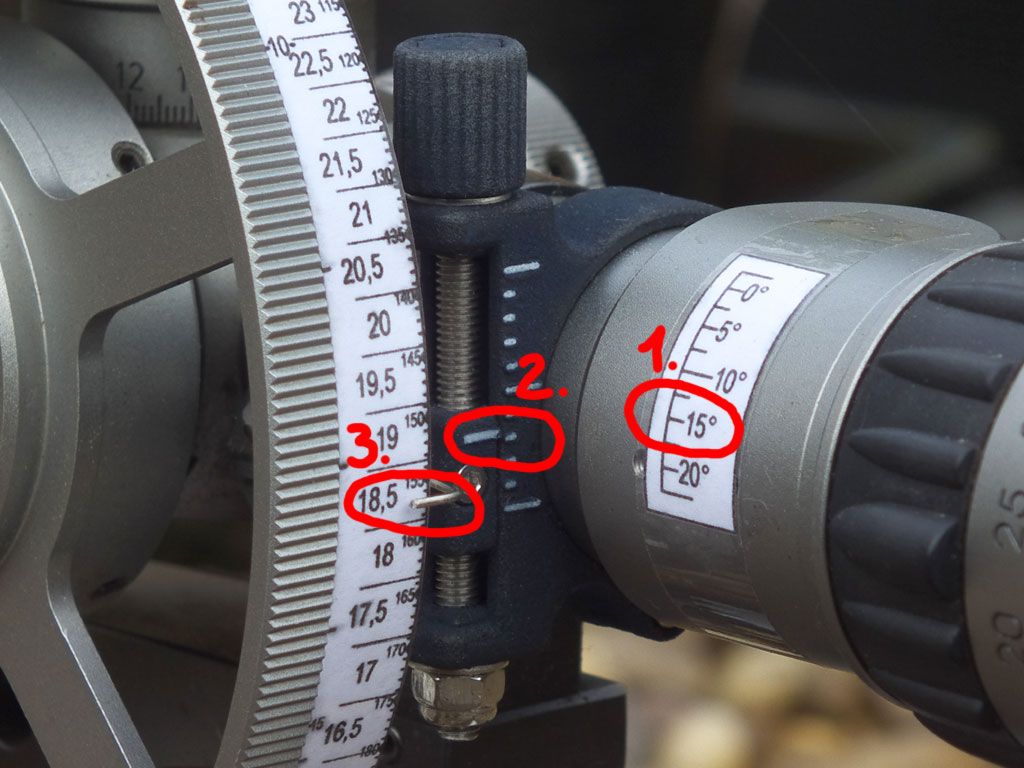
How to use the SmartPin pointer
I printed the sidewheel scale for 10°C so I can use my scope in a temperature range of -2.5…22.5°C. Of course I could have used another base temperature, summer and winter settings e.g. 20°C for 7.5…32.5°C or 0°C for -12.5…12.5°C, etc. But here in England, this scale on the picture will do all year :-)
Since the base temperature of my scale is 10°C, the middle position of the pointer will be used when it’s 10°C on the course. It it’s 15°C, I find this temperature on the small table (1), adjust the pointer to this position (2) and read the appropriate click and/or range value from the wheel (3). During a competition, I can periodically check the temperature of the scope (using aquarium temp strips) and can set the pin to the right position, so I don’t need to calculate compensations and shifts when shooting.
1. Temperature 2. Pointer 3. Reading
This is the precise and scientific method. If the temperature doesn’t change too much all the day, you can simply measure a 55 yards target on the zero range and then adjust the SmartPin pointer to the 55 yds mark on the sidewheel. Anyhow, your scope will rangefind the real distances, if you use this adjustable pointer properly.
The SmartPin adjustable pointer on the photos above has got only one pin, but I deliver it with two pins (as seen on the product page), so those shooters who are sensitive to light conditions. Usually, it’s not the scope’s fault, if you rangefind different ranges in different light conditions, it has much more to do with your eyes. The human eye accommodates much faster if the picture is highly detailed and light enough. As you rotate the sidewheel, your brain tries to correct the unsharp image so you will see it sharp a bit before it is really sharp. This difference depends on the light conditions, your age, your fitness at the moment etc. So you can use the twin pointers for light and dark targets, or for fresh and tired eyes, as you wish.
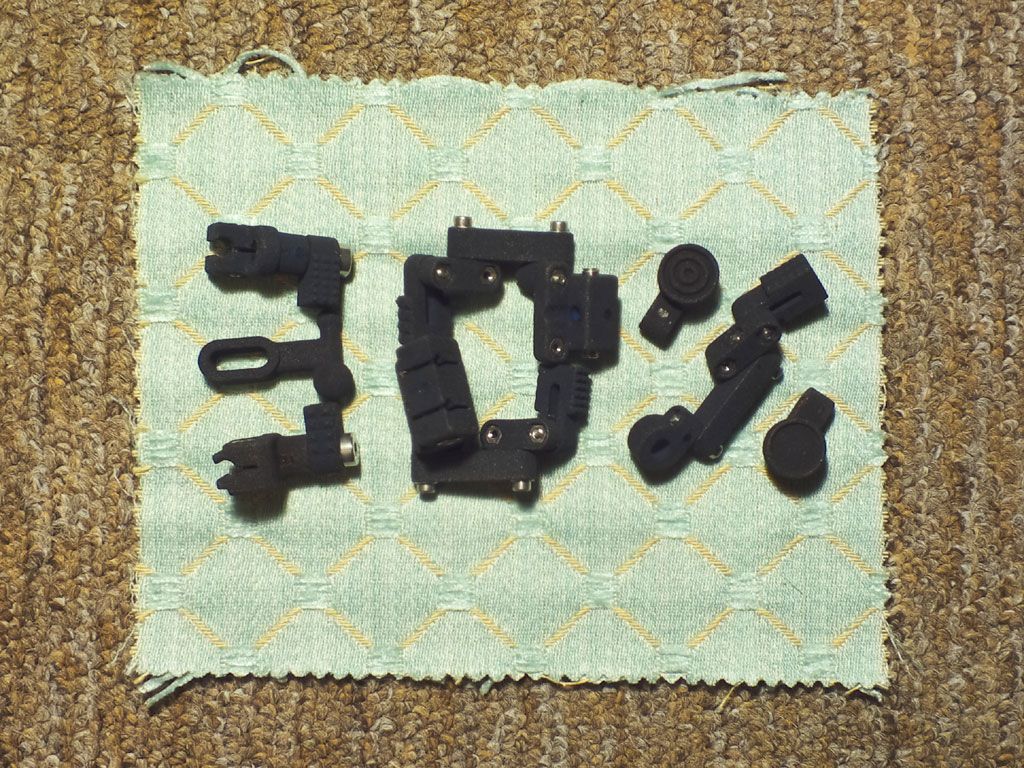
The first SmartPin adjustable pointers are now dyed, hard-oiled and assembled. Also the stainless steel pins have arrived. The white marks are not paint but the original white material, where I cut off the original marking lines. The pins look nice, too – all the metal parts are made of stainless steel.
SmartPin close-up photo
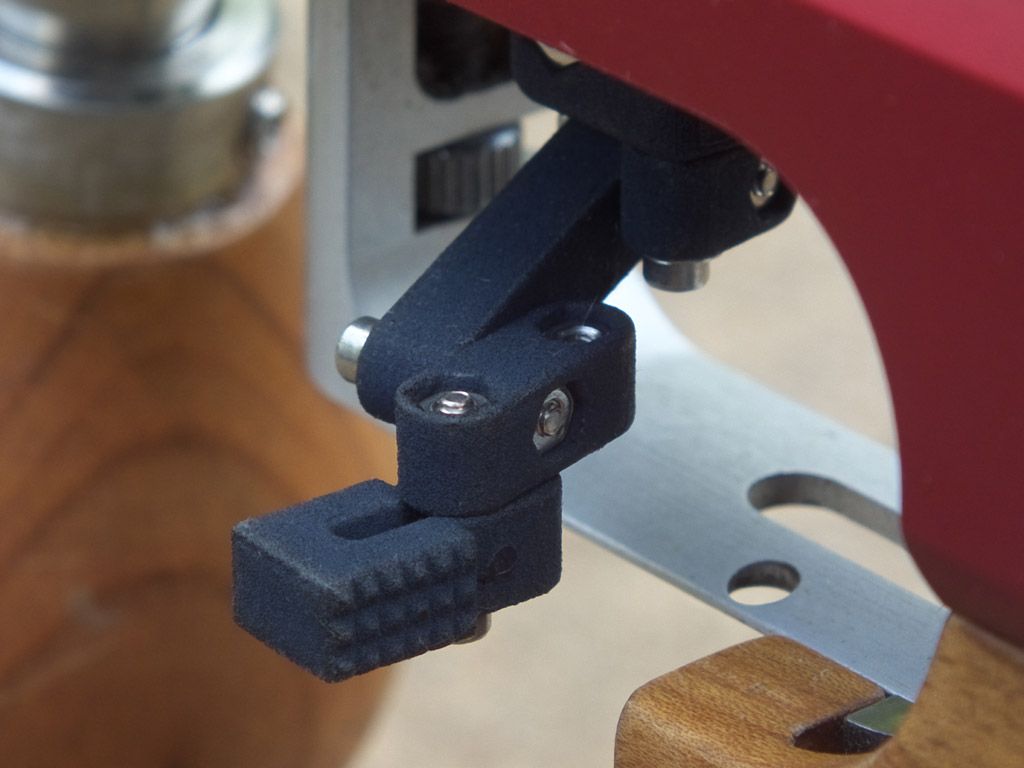
Finally, it is ready. I started to design this part months ago… The real trick is in the moving part, it is only 9x10x12 mm and this volume contains two M4 square nuts, an M2x8 screw with its nut, and two 0.95 mm pointer pins. Oh and an M4 screw goes through it, too. Now try to imagine how this all fits into this tiny place…
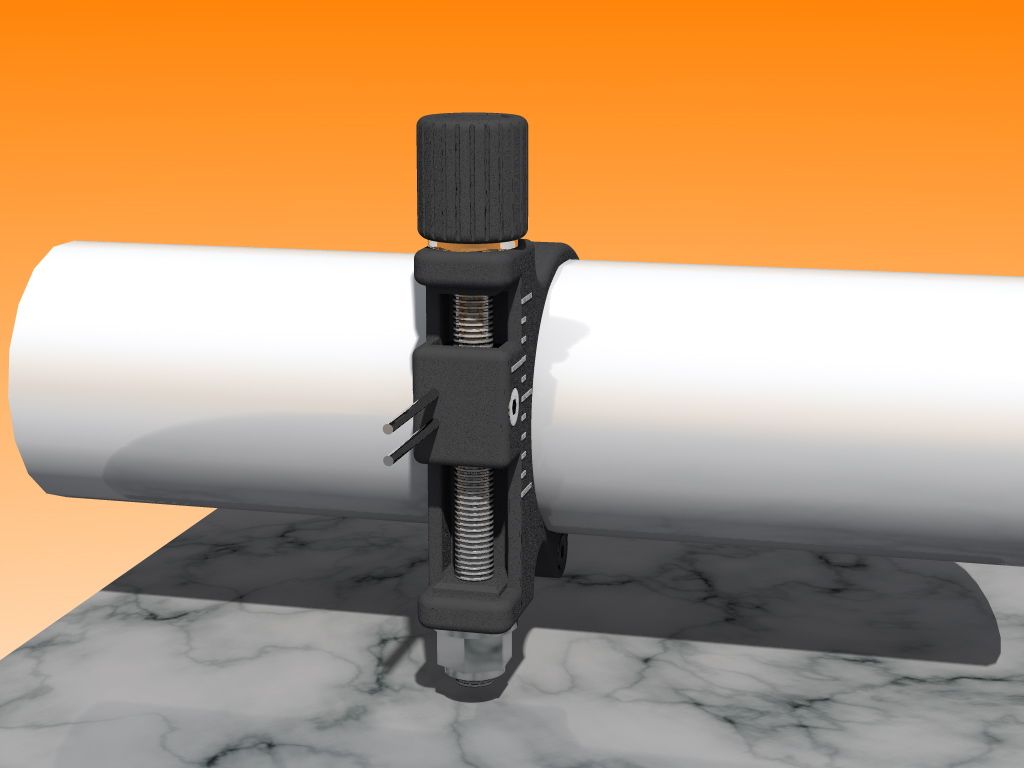
The new SmartPin Adjustable Scope Pointer
A few more photos of the final black version. This matte black surface is ideal for a device that is always before your eyes. The original white surface needs a finish, else it gets dirty extremely quickly. If you decide to buy a white one, you have to do the messy job yourself. On the first picture you can see the special (and of course, laser sintered) tools, that I designed for assembling and fine tuning of the adjustment mechanism.
Assembling the adjustment mechanism
Side view (only 10 mm!)
General view
Front view
It can happen that your scope tube is too crowded, there is a mount ring in the way (or the reticle illumination in my case). Don’t worry, take a paper clip and create your own pointer pin, with the appropriate shape, so did I :-)
Two new pointers in this product family: EasyPin (one-pin simple pointer) and MultiPin (5 pins, any of them removable). Lightweight, strong products with stainless steel screws and pins, on a bargain price. Soon will be available for ordering, watch this blog for news :-)
My triggers are compatible with the following rifles:
AirArms (ProTarget, EV-2, FTP-900)
Anschütz (8002, 9003)
Feinwerkbau (P600 series, P70, P700, P800)
Hämmerli (AR-20)
Steyr (LG-100, LG-110)
Walther (LGM-2, LG-210, LG-300)
Which trigger is the best for you? Have a look at the following short descriptions. More photos and information on the links below.
PinPoint Trigger
PinPoint Trigger — This is a simple but effective trigger, can be set to the centre or to 9.6 mm offset. Lightweight and It comes with a Pyramids trigger blade, and a wide variety of additional trigger blades can be selected. This is a cheap and simple trigger, but with a lot of benefits, as the stabile pull weight, the feel of the direction of pull, warm contact surface.
FlexiPoint Offset Trigger
FlexiPoint Offset Trigger — A very versatile trigger, the blade can be set in height, length, can be rotated and can have an offset from 0 to 46 mm. Also additional trigger blades are available. This trigger really can be set to the right position, can be used with offset grips, too. The main difference, compared to the PinPoint trigger is the height adjustment and the offset features.
PinPoint Standard Trigger Blades
PinPoint Standard Trigger Blades — Different surfaces for different trigger finger sensitivity: grooves, ridges, flat shapes with edges etc. Every blade has two different sides, with a fine and a coarse version of its surface pattern.
PinPoint Special Trigger Blades
PinPoint Special Trigger Blades — Ball trigger, Offset triggers (Pyramids, Ball and Round), Vertical trigger blade, FlexiArm. The offset blades and FlexiArm can be useful if a custom made wooden stock is too tight for the complete FlexiPoint trigger.
FlexiPoint Trigger Blades
FlexiPoint Spare Blades — Pyramids, Ball and four variations of Round trigger blade (Centre, Deep, Edge and Flat). Btw, I’m using the Round Edge version on my rifle.
Use the coupon code TRITHP at checkout to get 30% discount on all triggers and trigger blades until 9th November!
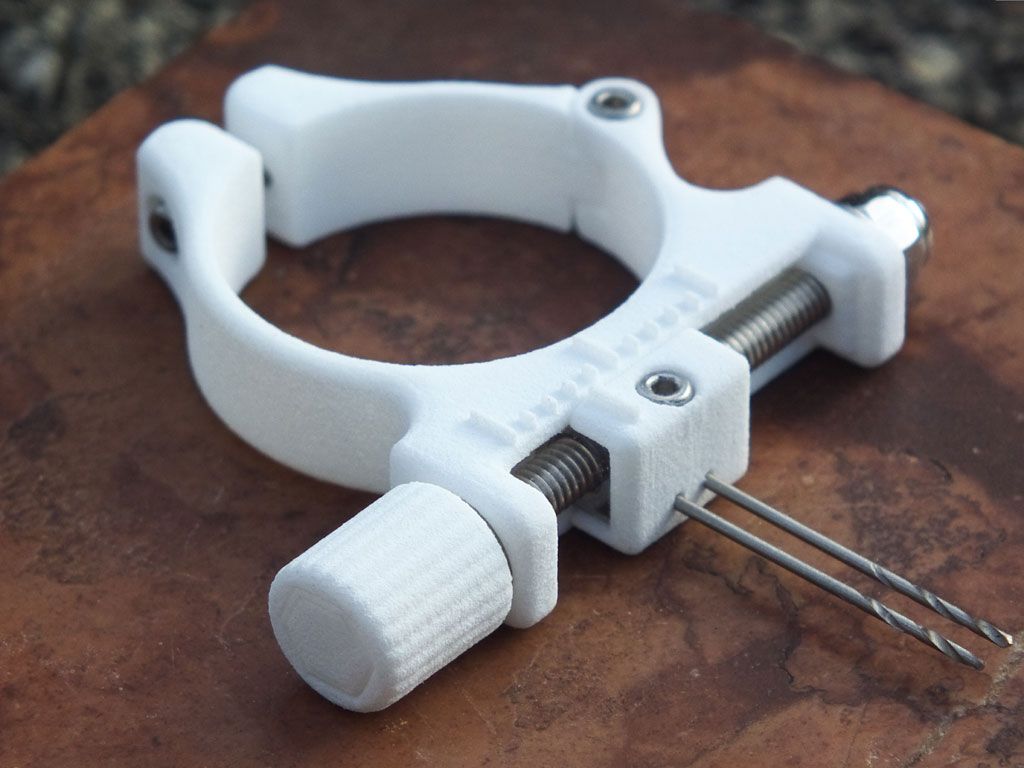
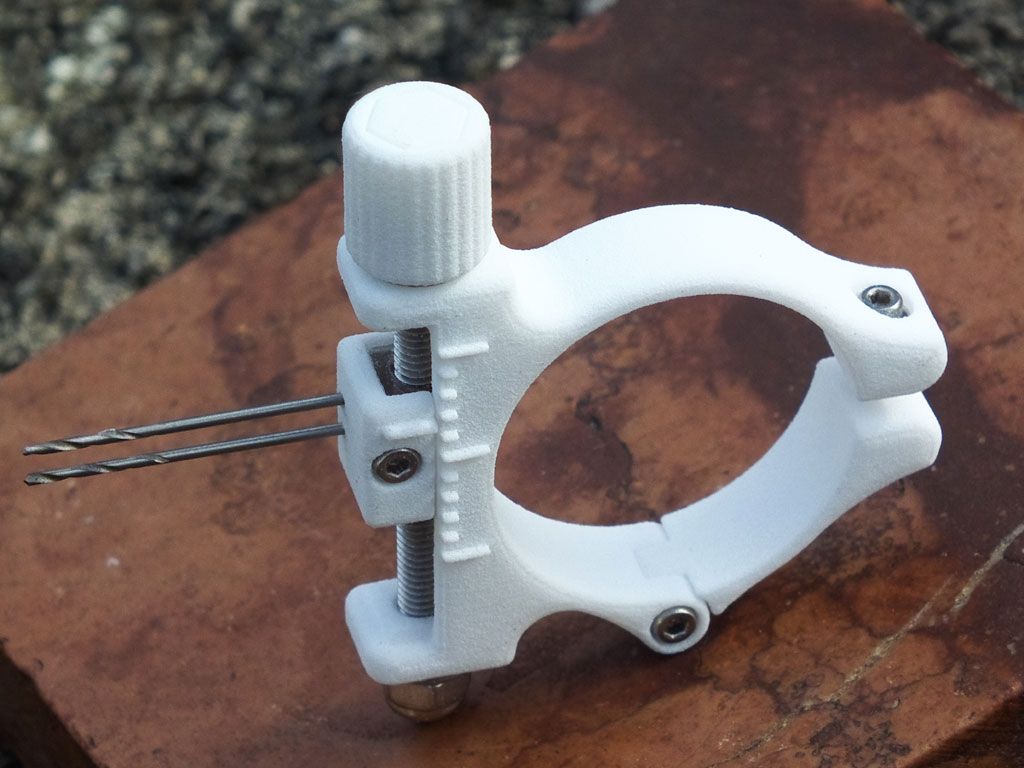
A small batch of the first SmartPin Adjustable Pointers has arrived. I’m still waiting for the stainless steel pins to arrive, so I used two 1 mm drills instead :-)
The new SmartPin Adjustable Scope Pointer
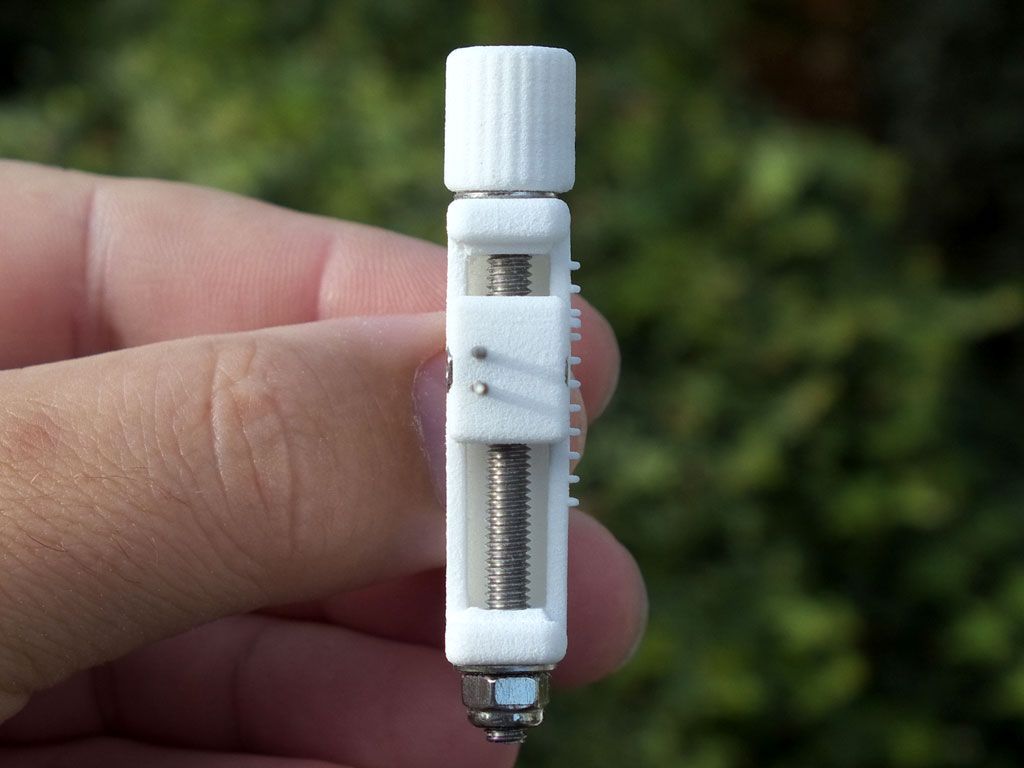
The pointer needs only a 10×10 mm space between the scope tube and sidewheel, so it will fit to most scopes.
Only 10×10 mm
10 mm wide
The mechanism is easy to adjust by two fingers, but an accidental touch of a gunbag or shooting jacket can’t move the pointer. Both pins are held by the small screw in the middle.
The mechamism
The scale lines stand out off the surface, I’ll cut them off only after dyeing so their place will remain white, for the better visibility.
Every shooter knows that rifle scopes have more or less temperature shift, i.e. the rangefinding moves with temperature. This movement can be continuous or can ‘jump’ suddenly. You can learn how it changes and can live with it, but using multiple pointers or multiple / slanted scales on the parallax wheel can be confusing, especially when you are timed on the competition.
SmartPin Adjustable Pointer for scopes
My new adjustable pointer can be precisely set, within a 20 mm range (marks for every 2 mm):
SmartPin animation
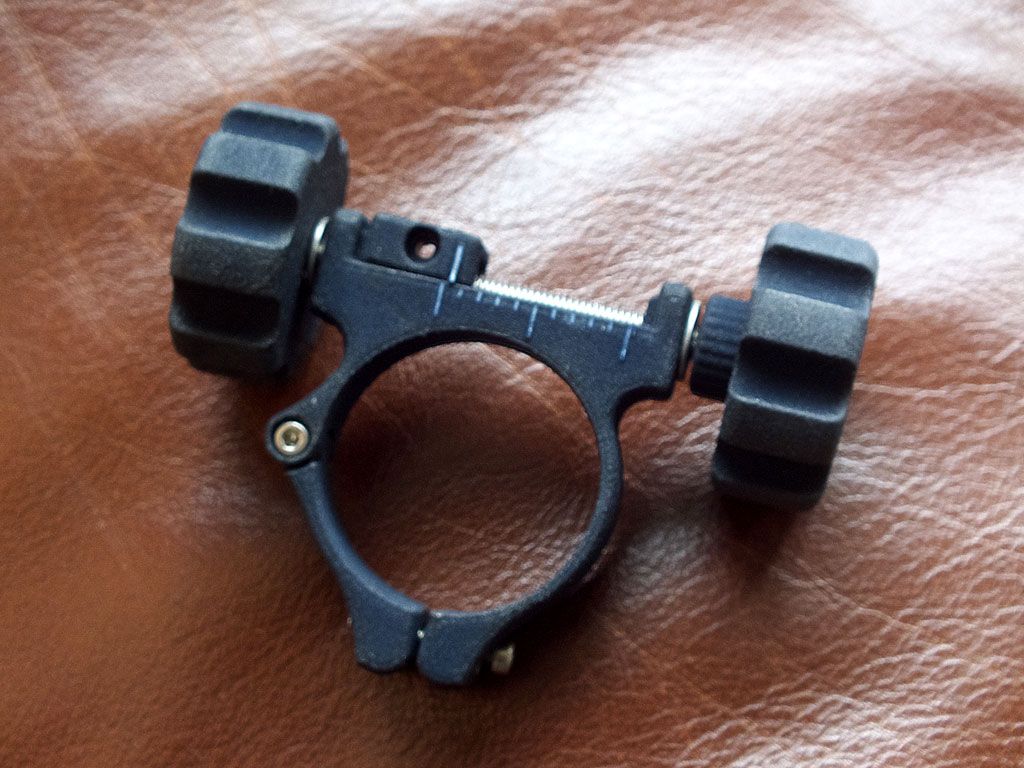
The pointer has got two pins, the (removable) additional pin is placed by 3 mm below the other one, so you can combine the effects (e.g. use the main adjustment to compensate the temp shift of the scope, and use the two pins for light and dark targets). The pointer is delivered with stainless steel pins, but if you need a longer or shaped pin, you can simply replace the original pins with any <1mm wire.
SmartPin Adjustable Pointer
I designed the SmartPin pointer to be as tiny as possible. Almost unbelievable, but the whole structure can fit into a 10×10 mm box when viewed from the top, so it won’t take too much place on the scope tube and will fit between the sidewheel and the tube on most scopes.
New product for Feinwerkbau P70 users: a comfortable loading port handle with safety.
Everybody knows that ugly white plastic handle that has to be pushed down by the thumb to close the loading port. I designed a longer arm, that has two round buttons at the end. This means that you can easily rotate the loading port by two fingers, instead of pushing it. The lower button has got a cable tie tail, this can be positioned by rotating the button, and works as a safety: when the loading port is open, it blocks the finger’s way to the trigger. As you close the port, it will go out of the way.
The loading port handle is a replacement unit for the original one, can be mounted easily with a small screwdriver. The arm and the buttons are made of laser sintered Nylon, with stainless steel screws.